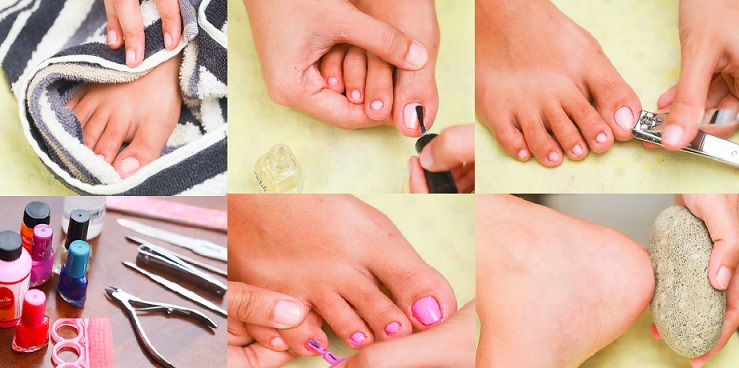
Every woman wants her feet to look perfect whenever she walks in her pretty silhouettes or sandals. Harsh and dry winter along with tough, busy routine makes your feet lose their beauty and shine. Our nails start to lose their smoothness too. So ladies! If you can’t manage to visit parlor every other week then no worries. We bring you the best of the pedicure techniques to your home. Now every other weekend you can have a nice pedicure. Give your feet a treat that will enhance their beauty altogether. Try to give your feet 20 to 30 minutes every week and the results will amaze you.
How to do a Perfect & Best Pedicure at home by Yourself- Step by Step Tutorial
The complete process of a perfect pedicure at home is divided into few following steps here. Follow each step carefully for the best results. Pedicure routine somehow resembles the techniques used in manicure; the difference lies in the tools that we use.
Things that are essential for a perfect home pedicure includes the following.
1. A tub and water for soaking
2.Nail clippers
3. A nail file
4. A cuticle stick/orange stick
5. A nail buffer
6.A pumice stone or scrubbing brush,
7. A clear top and base coat,
8. A polish color of choice
- Check all the material before initializing your first move. Keep them ready for use. Also, keep them separate and clean for every session of your pedicure. Adding this healthy act in your pedicure routine will keep your feet hygienic round the clock.
- What else you would need in this procedure are bath salts for soaking your feet, cuticle trimmers, cuticle oil, and lotion for a massage. At first, remove your pre-existing nail paint if you are wearing any.
- Then grab a tub, fill it with Luke warm water add some bath salts to it. Bath salts have the natural tendency to smooth your skin and will make it soft. The hot water will soften your calluses and allow them to get removed easily.
- Also, you will get rid of all the dirt and germs that your feet might carry. As the feet and toe skin is harder than the skin of our hands, therefore, give your feet extra ten minutes for soaking.
- Now that your nails and skin has become softer and smoother you can let your feet dry for a while. And then you need to cut your nails to the desired length and desired shape.
- File your nails gently. Smooth out all the edges. Give extra attention to the corners to avoid any ingrowths. Buff them up to smooth out the ridges too. Prepare your cuticle, remove the excess or push it outwards around the edges with an orange stick.
- If you have dry and cracked heels, then the use of pumice stone is a must. Rub the pumice stone over your heels and the ball of your feet. Rub it gently in circular motions. It will scrap off all the calluses and dead skin cells layer over your heels.
- Apply some moisturizer or lotion over your feet and let it settle for a while. Now you can start applying paint coats over your toenails. Apply a base coat and then carry on with the desired variety of nail colors you want.
Image Credits: WikiHow.com
See More As:
- Black Smokey Eye Makeup Tutorial Step by Step
- Amazing Fall Winter Makeup Tips & Tutorial Stepwise
- Best Party Wear Bold Makeup Tutorial & Ideas
- How to Make a French Manicure at Home- Tutorial
- How to make your nose look thinner & beautiful with makeup
Check Related Fashion & Style


